Tag Archives: sandboxing

Via squid and second host running tor

Intercepting SSL with squid proxy and routing to tor

There was a time when practically all malware communicated with its command and control (C2) servers unencrypted. Those days are long gone, and now much of what we would wish to see is hidden under HTTPS.  What are we to do if we want to know what is going on within that traffic?

Introduction

(for those who are unfamiliar with the HTTPS protocol and public key encryption)

The foundation of HTTPS is the Public Key Infrastructure. When traffic is to be encrypted, the destination server provides a public key with which to encrypt a message. Only that server, which is in possession of the linked private key, can decrypt the message. Public key, or asymmetric encryption, is relatively slow so instead of all traffic being secured with this, the client and server use this stage only to negotiate a new key in secret for a symmetrically encrypted connection. If we wish to be able to read the traffic, we need to obtain the symmetric encryption key.

How can this be achieved? If we are in a position to intercept the traffic, we could provide a public key that we are in control of to the client, and establish our own connection to the server. The traffic would be decrypted at our interception point with our key, and re-encrypted as we pass it to the server with the server’s key. However, because HTTPS must be able to keep information confidential, it has defences designed with this attack in mind. A key issued by a server is normally provided along with the means to verify that it is genuine, not falsified as we wish to do. The key is accompanied by a cryptographic signature from a Certificate Authority (CA), and computers and other devices using HTTPS to communicate hold a list of CAs which are considered trustworthy and authorised to verify that keys are valid. Comparing the signature against the client’s stored list enables the client to verify the authenticity of the public key.

If we wish to inspect encrypted communication, we must both intercept the secret key during the exchange, and convince the client that the certificate it receives is genuine. This post will walk through the process needed to achieve those two goals.

Design

Starting point

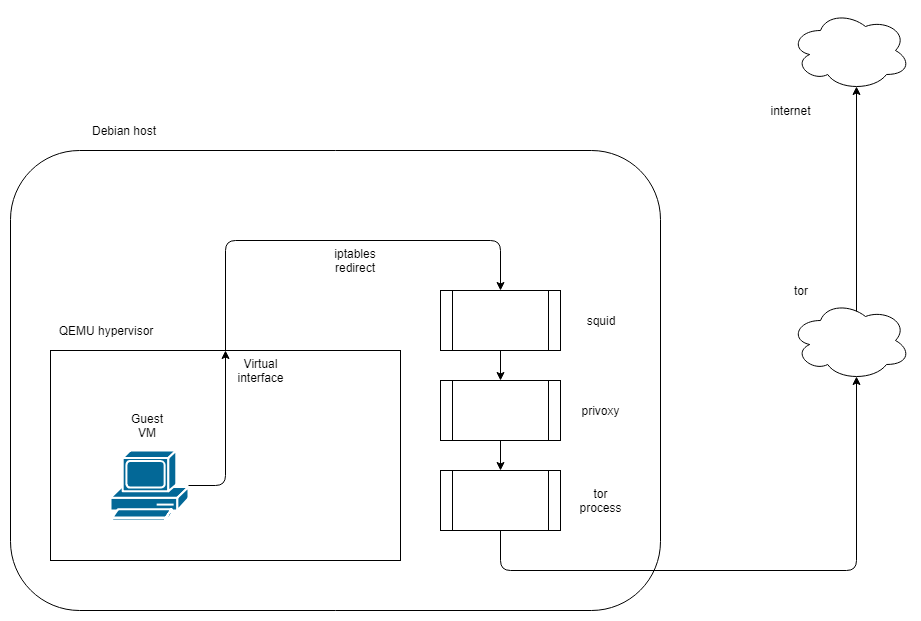
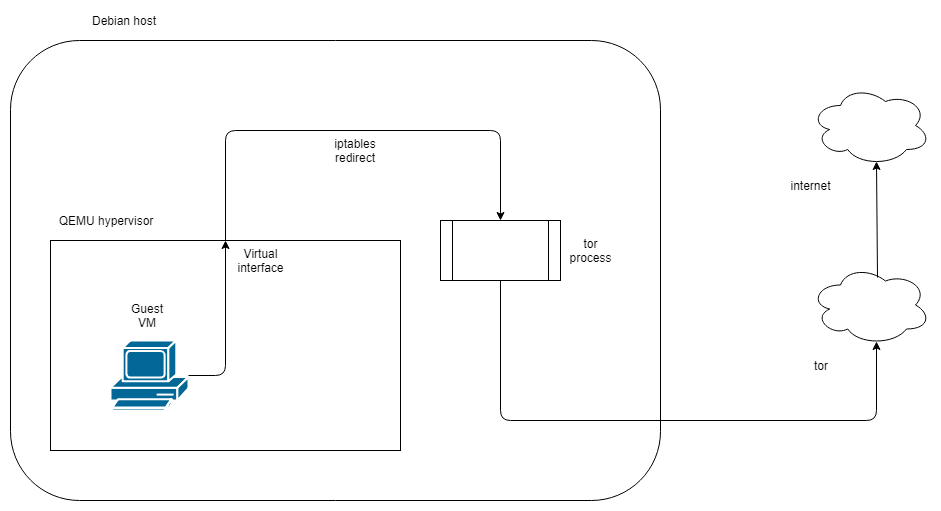
I have already been running a sandbox that routes traffic via tor. It is loosely based on Sean Whalen’s Cuckoo guide, and implements the tor routing without going via privoxy, as shown below.

Initial setup

Using this method allows me to run malware without revealing the public IP of my lab environment. It has certain drawbacks; some malware will recognise that it is being routed via tor and stop functioning, however the tradeoff is acceptable to me.

squid | tor

Using squid with tor comes with some caveats that make the eventual configuration a little complicated. The version of squid I am using (3.5.23) cannot directly connect to a tor process running on the local host. In order to route via tor locally you will need a parent cache peer to which the connection can be forwarded. Privoxy is capable of serving this purpose, so initially I attempted the setup shown below:

Via privoxy

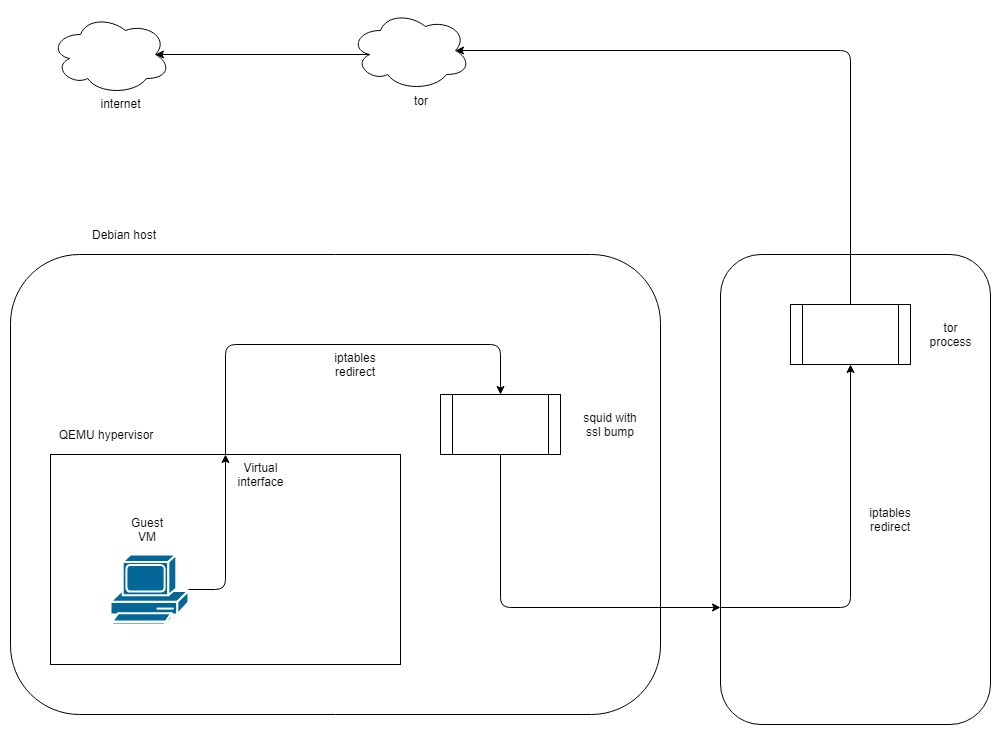
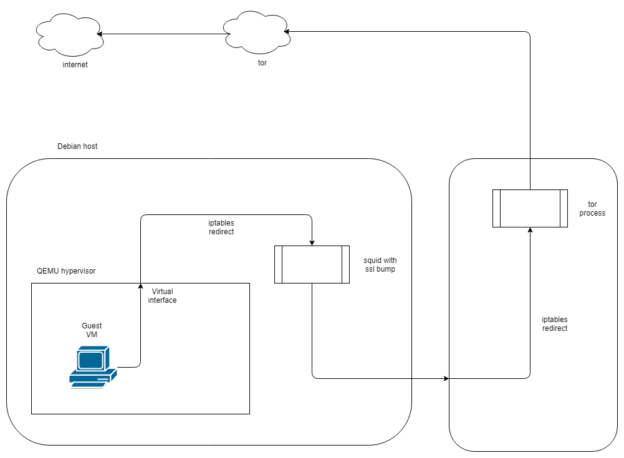
This configuration will function just fine if all you want is to proxy via squid. Unfortunately, this version of squid does not support SSL/TLS interception when a parent cache is being used. So, since we cannot use privoxy, and squid cannot route to tor on the same host, what can we do? Run tor on a different host!

Via squid and second host running tor

Implementation

squid with ssl intercept/ssl-bump

In order to use squid with ssl-bump, you must have compiled squid with the –with-openssl and –enable-ssl-crtd options. The default package on Debian is not compiled this way, so to save you some time I have provided the commands I used to compile it:

apt-get source squid
cd squid3-3.5.23/
./configure --build=x86_64-linux-gnu --prefix=/usr --includedir=${prefix}/include --mandir=${prefix}/share/man --infodir=${prefix}/share/info --sysconfdir=/etc --localstatedir=/var --libexecdir=${prefix}/lib/squid3 --srcdir=. --disable-maintainer-mode --disable-dependency-tracking --disable-silent-rules 'BUILDCXXFLAGS=-g -O2 -fdebug-prefix-map=/build/squid3-4PillG/squid3-3.5.23=. -fstack-protector-strong -Wformat -Werror=format-security -Wdate-time -D_FORTIFY_SOURCE=2 -Wl,-z,relro -Wl,-z,now -Wl,--as-needed' --datadir=/usr/share/squid --sysconfdir=/etc/squid --libexecdir=/usr/lib/squid --mandir=/usr/share/man --enable-inline --disable-arch-native --enable-async-io=8 --enable-storeio=ufs,aufs,diskd,rock --enable-removal-policies=lru,heap --enable-delay-pools --enable-cache-digests --enable-icap-client --enable-follow-x-forwarded-for --enable-auth-basic=DB,fake,getpwnam,LDAP,NCSA,NIS,PAM,POP3,RADIUS,SASL,SMB --enable-auth-digest=file,LDAP --enable-auth-negotiate=kerberos,wrapper --enable-auth-ntlm=fake,smb_lm --enable-external-acl-helpers=file_userip,kerberos_ldap_group,LDAP_group,session,SQL_session,time_quota,unix_group,wbinfo_group --enable-url-rewrite-helpers=fake --enable-eui --enable-esi --enable-icmp --enable-zph-qos --enable-ecap --disable-translation --with-swapdir=/var/spool/squid --with-logdir=/var/log/squid --with-pidfile=/var/run/squid.pid --with-filedescriptors=65536 --with-large-files --with-default-user=proxy --enable-build-info='Debian linux' --enable-linux-netfilter build_alias=x86_64-linux-gnu 'CFLAGS=-g -O2 -fdebug-prefix-map=/build/squid3-4PillG/squid3-3.5.23=. -fstack-protector-strong -Wformat -Werror=format-security -Wall' 'LDFLAGS=-Wl,-z,relro -Wl,-z,now -Wl,--as-needed' 'CPPFLAGS=-Wdate-time -D_FORTIFY_SOURCE=2' 'CXXFLAGS=-g -O2 -fdebug-prefix-map=/build/squid3-4PillG/squid3-3.5.23=. -fstack-protector-strong -Wformat -Werror=format-security' --with-openssl --enable-ssl-crtd
make && make install

The configuration above is identical to the precompiled one in the Debian Stretch repository, apart from the addition of the SSL options. If you are using a different distro the above command may not work.

Most of my configuration is based on the guide in the official squid documentation. My squid configuration is as follows:

acl ftp proto FTP
acl SSL_ports port 443
acl SSL_ports port 1025-65535
acl Safe_ports port 80 # http
acl Safe_ports port 21 # ftp
acl Safe_ports port 443 # https
acl Safe_ports port 70 # gopher
acl Safe_ports port 210 # wais
acl Safe_ports port 1025-65535 # unregistered ports
acl Safe_ports port 280 # http-mgmt
acl Safe_ports port 488 # gss-http
acl Safe_ports port 591 # filemaker
acl Safe_ports port 777 # multiling http
acl CONNECT method CONNECT
acl LANnet src 192.168.80.0/24 # local network for virtual machines
acl step1 at_step SslBump1
http_access deny !Safe_ports
http_access deny CONNECT !SSL_ports
http_access allow localhost manager
http_access allow LANnet
http_access deny manager
http_access allow localhost
http_access deny all
http_port 3128 intercept # intercept required for transparent proxy
https_port 3129 intercept ssl-bump \
    cert=/etc/squid/antfarm.pem \
    generate-host-certificates=on dynamic_cert_mem_cache_size=4MB
ssl_bump peek step1
ssl_bump bump all
sslcrtd_program /usr/lib/squid/ssl_crtd -s /var/lib/ssl_db -M 4MB
sslcrtd_children 8 startup=1 idle=1
access_log daemon:/var/log/squid/access.log logformat=combined
pid_filename /var/run/squid/squid.pid
coredump_dir /var/spool/squid
refresh_pattern ^ftp: 1440 20% 10080
refresh_pattern ^gopher: 1440 0% 1440
refresh_pattern -i (/cgi-bin/|\?) 0 0% 0
refresh_pattern . 0 20% 4320
request_header_access X-Forwarded-For deny all
httpd_suppress_version_string on
always_direct allow all

Use the SSL certificate generation process shown in the linked guide. Once you have created the .pem file, copy the section from —–BEGIN CERTIFICATE—– to —–END CERTIFICATE—– into a new file with the extension .crt.

A few notes here:

  • The ‘intercept’ keyword is necessary if you are using iptables to redirect ports to squid as a transparent proxy. If you configure your client to explicitly use a proxy, you should not use it.
  • The always_direct clause is used because we are routing squid’s output to another host (running tor) as the default gateway. If you wanted to use the squid → privoxy → tor configuration locally, you would use ‘never_direct’ instead.
  • The path for the ssl_crtd tool in Debian is /usr/local/squid/ssl_crtd – no libexec.
  • When setting permissions for the cache directories in Debian, use “proxy:proxy” instead of “squid:squid” as this is the default user that Debian creates to run the squid service.

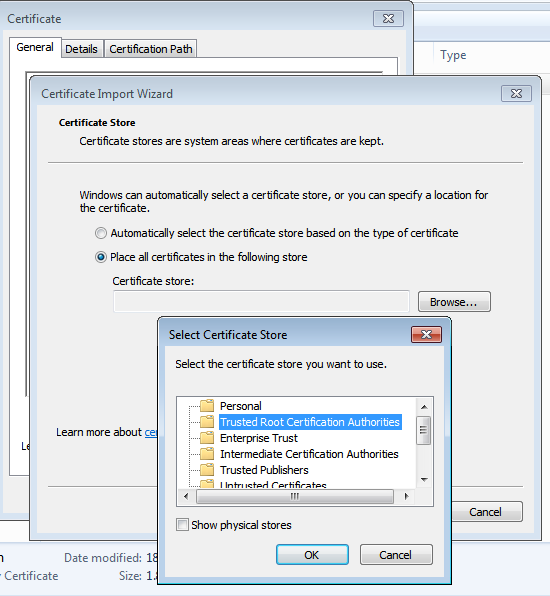
In order for the virtual machine to treat the falsified public keys as genuine, we must instruct it to trust the certificate as created above. For a Windows 7 host like mine, double click the .crt file and import the certificate in to the Trusted Root Certification Authorities store.

Importing a cert

With squid set up and certificate imported, you must then configure iptables on the hypervisor host to redirect traffic through squid.

iptables -t nat -A PREROUTING -i virbr0 -p tcp --dport 80 -j REDIRECT --to-port 3128
iptables -t nat -A PREROUTING -i virbr0 -p tcp --dport 443 -j REDIRECT --to-port 3129

where virbr0 is the name of the virtual interface in QEMU. You should adjust interface name and destination ports as required for your setup.

tor service

On the second host I have installed tor (version 0.2.5.16 from Debian Stretch repo). This is configured with ports to listen for TCP and DNS connections in /etc/tor/torrc:

TransPort 192.168.42.2:8081
DNSPort 192.168.42.2:53

Then with iptables, inbound traffic from the hypervisor host is redirected to tor:

-A PREROUTING -s 192.168.42.4/32 -i eth0 -p tcp -j REDIRECT --to-ports 8081
routing

Since the objective is to keep my real IP hidden, care must be taken to ensure the host’s routing does not leak information. In /etc/network/interfaces, instead of specifying a gateway, I added two routes:

up route add -net 192.168.0.0 netmask 255.255.0.0 gw 192.168.40.1
up route add -net 0.0.0.0 netmask 0.0.0.0 gw 192.168.40.2

This causes all traffic not intended for my internal network to be routed to the host running the tor service (on 192.168.40.2). I have then configured my firewall so that it only allows connections reaching in to this VLAN, or from the tor host, not from the malware VM hypervisor.  When updates are required, connectivity can be enabled temporarily, with the VMs paused or shut off. Alternative techniques include allowing the hypervisor host to update via tor (if I didn’t mind it being slow), or routing the traffic from the VMs without NAT and denying anything outbound from the VM network on my core router, but that’s something to look at another day.

With the gateways set up, the routing for the VM interface can then be applied on the hypervisor host:

iptables -t nat -A POSTROUTING -o eth0 -j MASQUERADE
iptables -A FORWARD -i virbr0 -j ACCEPT

After applying these rules you should have a fully functioning TLS/SSL intercept routed via tor. To test, start by attempting to resolve a few hostnames from the VM and verify that the traffic is hitting your tor service host BEFORE giving any web pages a spin. Move on to HTTP/HTTPS traffic once you are sure DNS is working correctly.

Usage

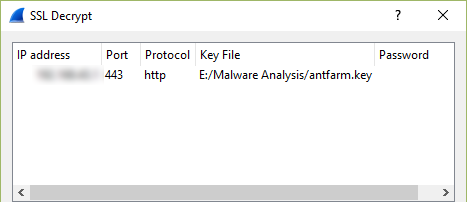
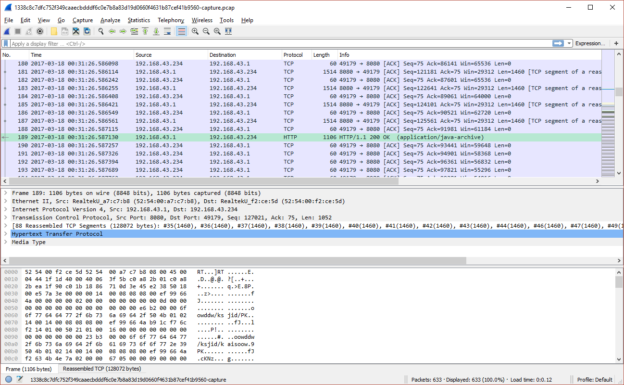
Once you have a functioning setup you should expect to see both HTTP and HTTPS URLs appearing in your squid access log. In addition, if you perform a packet capture on the hypervisor virtual interface (virbr0 in my case), you can use the key generated earlier to view the decrypted traffic in Wireshark. You will need to copy the private key section of the .pem file to a new file to use in Wireshark. When entering the protocol as described in the link above, use ‘http’ in lowercase – uppercase will not work.
importing an SSL key in wireshark

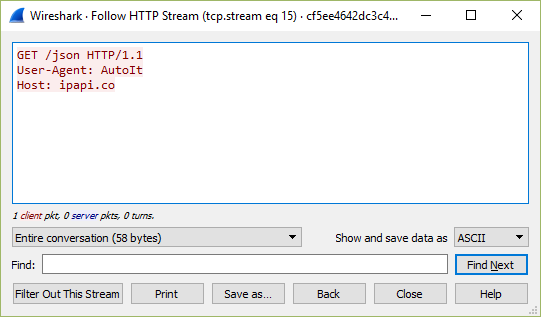
decrypted output of call to https://ipapi.co

Sandbox stealth mode: countering anti-analysis

20,000 Leagues Under The Sand – part 6

read part 5

As long as there are robbers, there are going to be cops. The bad guys know perfectly well that people will be trying to identify their malware, and have all sorts of anti-analysis tricks up their sleeves to evade detection. Malware will very often perform checks for common analysis tools and stop running if it identifies their presence. Since one of the most fundamental tools for a malware analyst is the use of a virtual machine, it is the subject of numerous and varied detection attempts in many families of malware.

Simple strings

In its default configuration, a virtual machine is likely to have a wide range of indicators of its true nature. For example, it is common for standard peripheral names to contain hints (or outright declarations) that they are virtual.

VirtualBox DVD indicator

VirtualBox DVD drive

This is likewise the case for QEMU/KVM among others. As well as peripheral devices, the CPU vendor information may also be an indicator:

Device Manager processor info in QEMU/KVM

Device Manager processor info in QEMU/KVM

Less obvious to casual browsing but still perfectly simple for code running on the system to detect are features such as the CPUID Hypervisor Bit, MAC address, and registry key indications such as the presence of BOCHS or VirtualBox BIOS information in the registry.

SystemBiosVersion registry value

SystemBiosVersion registry value

These detections depend on the code of the hypervisor; in some cases they can be overcome by specifying particular configuration values, and in others they can only be solved by modifying the source code of the hypervisor and recompiling it. Fortunately for my choice of QEMU/KVM, many people have already looked at this particular problem and some have been generous enough to publish their solutions. There is also a fair amount of information out there for VirtualBox (partly because Cuckoo favours this hypervisor), and some for VMWare ESXi.

Bad behaviour

Another means of detecting an analysis environment is to collect information indicating the behaviour and use of the system. As discussed in part 4 of this series, simulating the presence of a user is an important ability to counter this evasion method. You should also consider environmental factors such as uptime (it is improbable that a user would boot a system and immediately run malware; some samples look for a minimum uptime period).

Presence of the abnormal, absence of the normal

One of the side effects of Windows being engineered to be helpful, is that it leaves behind traces of a user’s activity everywhere. In addition, people are messy. They leave crap scattered all over their desktop, fill their document folders with junk, and run all sorts of unnecessary processes. Looking for evidence of this is quite simple, and malware has been known to refuse to run if there are insufficient recent documents, or very few running processes.

Malware may also attempt to evade detection by searching for running and installed services and the presence of files linked to debuggers, analysis tools and the sandbox itself (e.g. VirtualBox Guest Additions).

Anti-analysis could be a series all of its own, and my understanding of it is still quite narrow. I strongly encourage you to research the topic yourself as there are tons of excellent articles out there written by authors with far more experience.

Presentation

Although it is not specific to sandboxing, I do not feel this series would be complete without some mention of the delivery of the output. You can write the best code to manage, control, and extract data from your sandbox in the world, but it is worthless if you cannot deliver it to your users in a helpful fashion. Think about what types of data are most important (IDS alerts/process instantiation/HTTP requests?), what particular feature of that data it is that makes it useful (HTTP hostname? destination IP? Alert signature name, signature definition?) and make sure that it is clearly highlighted – but you MUST allow the user to reach the raw data.

I cannot stress this enough. Sandboxes are a wonderful tool to get the information you need as a defender (though not everyone is so enthusiastic), but they are imprecise instruments. The more summarised and filtered the information is, the higher the chance it has to lead the analyst to false conclusions.

You should look at other sandboxes out there and draw inspiration, as well as learn what you want to avoid (whether because it’s too complicated for you right now, or you just think it’s a bad way of doing things) when making one yourself. Start by looking at Cuckoo, because it’s free and open source. Take a peek at the blogs and feature sheets of the commercial offerings like VMRay, Joe Sandbox, Hybrid Analysis, and the very new and shiny any.run.

Conclusion

Sandboxing is a huge topic and I haven’t begun to scratch the surface with this series. However, I hope that I have done enough to introduce the major areas of concern and provide some direction for people interested in dabbling in (or diving into) this fascinating world. I didn’t realise quite how much work it would be to reach the stage that I have; getting on for 18 months in, I’m still very much a novice and my creation, whilst operational, is distinctly rough around the edges. And on all of the flat surfaces. But it works! And I had fun doing it, and learned a ton – and that’s the main thing. I hope you do too.

Mounting image with python-guestfs

Automating a sandbox: Evidence Collection

20,000 Leagues Under The Sand: Part 5

read part 4

You may have a tricked-out sandbox that logs host activity, does packet capture and IDS, and will make you a slice of toast, but none of the bells and whistles will do you any good without collecting the information and putting it in front of your eyes. The techniques required will test your knowledge of network and file system forensics, as well as your skill with code. Let’s start with an easy one.

Suricata logs

If you have followed the suggestions made earlier in this series, Suricata will be writing events to files in /var/log/suricata/ in JSON form, one object per line. This lends itself to ease of use; pretty much any language will have a good JSON parsing library. All you will need to do is filter for entries based on the timestamp being within the period you were running your malware sample.

Be aware that the Suricata log does not get truncated unless you have specified. If you read and filter the log using  the simplest method (line-by-line read from the start, parsing each event then filtering), this will eventually become very slow. You should consider rotating the file, either yourself or using Suricata’s built in rotation, and make sure that your parsing and filtering takes account of this rotation.

Packet capture

As mentioned in the post discussing networking, you can either create a per-run packet capture as part of your code (assuming your language has the appropriate libraries), or a systemwide one which you can then extract portions of.

If you only ever plan to have one guest VM sandboxing malware at a time, the per-run capture should be fine and relatively simple. If you are slightly nuts ambitious like me and want to design for the possibility of several in parallel, a systemwide capture would be more suitable. Again, depending on the way you have organised capture, you should make sure your code accounts for the rotation of the pcaps.

Host activity/event logs

Early on in this series I waxed lyrical about the advantages of Sysmon. I am not going to contradict any of that here, but collecting its output is not as simple as you might think. Windows event logs get written to EVTX files, but not necessarily immediately. Therefore although an event may be generated, its presence in the EVTX file is not guaranteed. Under testing I have found that not even a shutdown is a guarantee of the events being written to the file. The only method I have found to be 100% reliable is to query the Windows Event Log API¹. Therefore, to collect Sysmon logs in a reliable fashion, you need to be able to use the Windows API.

I am aware of two methods for doing this. The first is to write a program which queries the API, and run that in your sandbox. You can then write the data to a file, or send it out of the sandbox immediately. To send it out of the sandbox you could have a service on the host listening on the virtual network interface, such as an FTP or HTTP server.

The second method would be to use Windows Event Forwarding. This is a tremendously useful technique for blue teamers and comes highly recommended by Microsoft staff. It does, however, require you to have a second Windows host on which to collect the events, which may not be an option for you. Most documentation you will find on this will refer to setting it up in an Active Directory environment, however it is also capable of running in workgroup-only systems.

¹ I strongly suspect that the events are being written to temporary files but at the time of writing this is little better than a hunch. I’ll chase down my suspicion at some point and if it’s right there’ll be a new post about my findings.

Filesystem collection

Getting events is a huge win, and might well be all you need; but why not go one step further? Malware drops and modifies files and writes to the registry, and if you could get your hands on that evidence, it could be invaluable. Another of the reasons for choosing LibVirt/QEMU as my hypervisor was the availability of python bindings for LibGuestFS, allowing me to directly mount and read QEMU disk images. However, you should still be fine with other hypervisors: VMWare also provides a utility for this, and VirtualBox can apparently be mounted as a… network block device? Please can I have some of whatever Oracle have been smoking, because it’s clearly the good shit.

Detailed coverage of the options for filesystem evidence collection could run to several blog posts of its own, so I won’t go into everything here. However, I will describe three approaches, each with their own advantages and drawbacks.

  • Diffing from a known-good state

The slowest, but most comprehensive method. Requires building a comprehensive catalogue of the hashes of all files on the disk prior to malware execution, and another one after, and identifying the differences. Not recommended unless you are truly desperate to roast your CPU with hash calculations.

  • Metatadata-based selection

Since you know the lower and upper time bounds for possible activity by the malicious sample, you can walk the directory tree and select only items which have been changed or created in that period. Relatively quick, but some malware is known to modify the MFT record with false created/modified values, known as ‘timestomping’.

  • Key items and locations

The majority of malware activity is limited to just a few locations. Taking a copy of the user directory, and SYSTEM and SOFTWARE registry hives, plus a couple of other items, would capture the traces left by most samples you might ever run.

There is a final option for collection of file-based evidence, and that is to use a host agent which collects the files as the malware writes them. The above methods would fail to capture a file that has been created and subsequently removed. In an earlier post I mentioned that if you were so inclined, you could write code which would monitor API calls yourself. Doing this would also give you the ability to capture temporary files in addition to the ones which are left behind.

Hopefully you now have an idea of the approaches you can use to gather useful information from the execution of a malware sample without the need for manual intervention. The final post in my series considers anti-analysis techniques and countering sandbox evasion.

Automating a sandbox: Guest VM control

20,000 Leagues Under The Sand, part 4

read part 3

When running malware in a virtual machine sandbox, proper management of the VM is imperative to prevent (unwanted!) contamination. You may already know that it is good practice to establish a clean state with a snapshot prior to running a potential nasty, so that you can simply restore it to get back to a known good state. It’s generally pretty intuitive to do this in a hypervisor’s GUI. It’s also pretty obvious how to run the malware you’re interested in – double click and hey presto, malware happens. But what do you do if you want all that to take place without you in the driving seat?

Hypervisor APIs

There are three core elements to automating a sandbox:

  • Controlling the guest VM’s state
  • Interacting with the guest
  • Capturing information from the guest

Fortunately, automating virtual machines is a requirement for far more than just the niche world of malware analysts. For nearly every function you could imagine, there is a means of controlling it with code instead of a GUI. You may have already noted that for my sandbox I chose QEMU/LibVirt, and one of the core reasons was the extensive resources for controlling it in the language I am most comfortable with, Python. If you are more partial to other languages, you can also choose from C, C++, C#, Go, Java, OCaml, Perl, PHP and Ruby.

Other hypervisors also have decent APIs; VirtualBox supports C++, SOAP (yuck), Java, and Python. Hyper-V is (naturally) controlled with Powershell. And so on and so forth.

Hypervisor APIs are primarily designed around the first of the three core elements (control), though there are some aspects for interaction and information capture available also. So to begin with the VM state, let us consider what control we might need. Since we want to make sure our results are relevant to the particular malware we have selected, we must be able to place the VM into a clean state. It is also sensible to only have the VM active when we are actually using it, so pausing/unpausing is also desirable (a cold boot might work, but you would either have to devise a means of logging in, or configure the VM for automatic login; plus it wastes time). These options are both possible through the LibVirt APIs.

Guest interaction

Two items involving guest interaction are essential to automate the testing of malware:

  • Deliver the sample to the guest
  • Execute the sample

You must transfer the sample to the guest’s file system. This can either be done from the host, or from the guest. It is theoretically possible to write directly to the filesystem, though this is strongly advised against for running VMs as it can cause corruption. Exposing a share with write permissions to the host is another option. The reverse can be done from host to guest (also not recommended). In my case I have chosen to cause the guest to download the file from a HTTP server exposed on the host’s virtual network interface. This is done with a small service running on the guest¹.

Running the sample can be done in a few ways. One that I experimented with was via a command:

cmd /c start C:\Users\<user>\Desktop\malware.exe

This should cause the file to be started with its default program and parameters. However, my results with this method were extremely unreliable, particularly with Java .jar files. It may have been possible to find out what was breaking things and fix it, but after a few weeks I was just tired of it and decided to try something else. What I wanted instead was for something that I could guarantee would work without fail. Enter VNC.

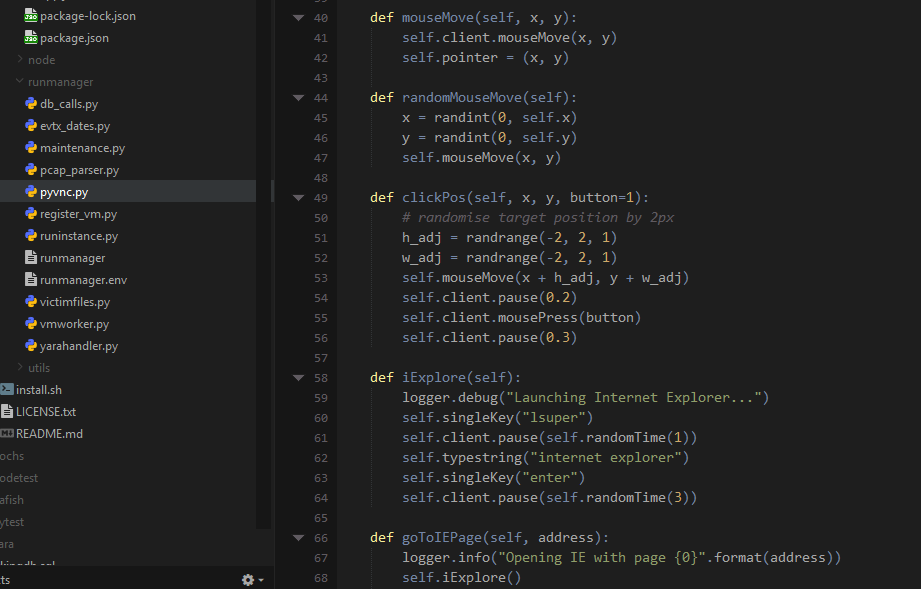
VNC is a protocol for remotely interacting with the graphical interface of a system. LibVirt comes with VNC as one of the options for interacting with guests; and handily there is a python library with which you can control VNC. Using this allowed me to send mouse movements and clicks, launching the file just as a user would. I should note here that the default protocol for interacting in LibVirt, Spice, is also capable of automation with python; however all of the resources I was finding when starting out helped me to get VNC working and I have not investigated the alternative at this point.

What we are doing here is not just executing the malware – we are simulating a user interacting with the system. This is important, because there is plenty of malware around that pays attention to what the user input is doing and will decide not to play ball if, for example, the mouse is not moving. I have also seen examples in which the malware will check for noticeable changes in the display and hide if it does not change – so just clicking empty bits of desktop is not going to help. Other samples might only become active if you visit the website of a bank (or any site the author is interested in – but mainly I have heard this in relation to banking malware). Capturing the activity of malware that does these things make simulating a variety of actions important.

Python code to interact with VM using VNC

VNC interaction in python

When simulating activity it is important to be aware of the limitations. If you are driving a sandbox, looking at a screen, you can react to what you see and adapt your actions. If a program has not finished running or a website has not loaded, you know to wait. You know what part of the screen is a login button for you to click, you know if there is a pop-up message that you have to approve or deny before progressing.  A script controlling a VNC mouse and keyboard – unless you do some extraordinarily ambitious work with image recognition – has no concept of these things; you must carefully tailor and test your scripted actions to take account of them. Even having considered these things, my sandbox sometimes has problems; I believe some of the time this is down to hardware resource limitations – although I have programmed pauses at moments I expect something to be loading, if something else on my host decides it needs CPU time and slows everything down, the pause I’ve created might not be enough. This is just one of the possible reasons but hopefully it illustrates that the issues can strike from unexpected directions.

I hope this has been informative; the next post discusses automatic collection of artifacts and evidence from the malware you have just executed.

Sandbox networking, packet capture, and IDS

20,000 Leagues Under The Sand: part 3

read part 2

Just as important to a sandbox as identifying actions the malware took on the host is observing its behaviour on the network. These days malware is almost guaranteed to have network activity; understanding how a sample is communicating is often all that is needed to tell you what the malware is.

When setting up a sandbox, careful thought needs to be given to your networking setup. Most malware is concerned only with reaching its command and control (C2) servers, but in the past year multiple malware families have seen lateral movement capabilities added, helped in no small part by the release of the EternalBlue SMB exploit. Under no circumstances should traffic from your sandbox VMs have unrestricted access to your network. Fortunately, most hypervisors’ default options make it simpler to do it safely than not – just be aware of the potential.

Additionally you should consider attribution and evasion; malware authors police the origins of connections and are known to blacklist the addresses of AV vendors, security researchers, and tor. If you would rather not have your IP on one of these lists you should think about how you can control the way malware traffic exits your network. Possibly the safest way is to route your traffic out through a consumer ISP that dynamically assigns IP addresses – so you might not need to do anything, as a large proportion of ISPs use this as their default. If you have static addressing and can’t afford a second line to your property, you might be able to set this up with a 4G router and data plan. At the minute, my sandbox is routing via tor as I do not have the option of a dynamic IP without spending more money, and I would prefer to risk some malware not functioning over advertising my IPs.

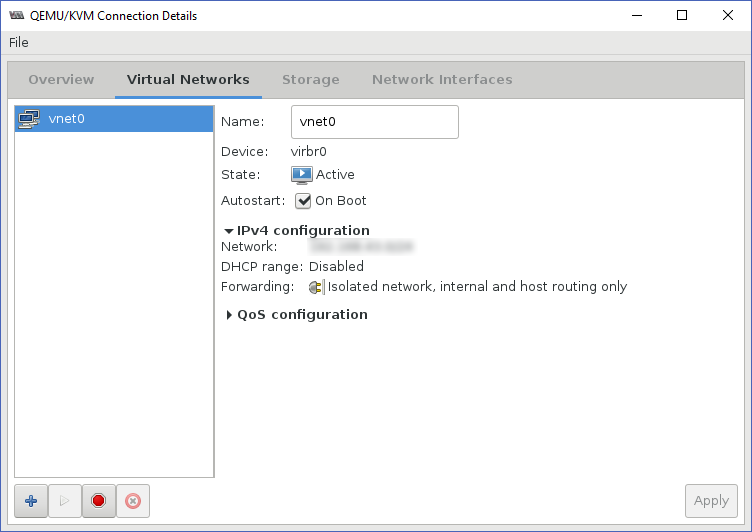
Whichever way you route your traffic, it is pretty simple to capture the output and perform intrusion detection when using qemu/Libvirt. In order to route traffic from VMs, it is necessary to create a virtual network interface.

Libvirt network configuration

Libvirt network configuration

This interface will be added to your system’s available network interfaces and is valid for use with tcpdump, Suricata, etc. N.B. when listing IPs/interfaces with ‘ip addr’ you will see the virtual bridge interface and virtual network listed separately, and the IP/subnet you have assigned will be defined on the bridge interface (named virbr0 or similar). Be careful about your choice of which interface to capture on; there are potential pitfalls for each. 

Firstly, the virtual bridge interface. When initially creating this post I encountered an issue with capturing at the virbr0 in which inbound packets for a TCP session had the correct source/destination IPs, but outbound packets showed the destination as being the gateway IP for the virtual network. As a result Suricata, Wireshark, and other tools could not reassemble the sessions correctly. I never identified precisely why this was so; unfortunately this means I cannot provide any specific advice for avoiding or fixing it other than to say it was probably related to the packet-rewriting rules being used to redirect traffic to tor.

I then switched to capturing on the virtual network, vnet0. This solved the problem of the inbound/outbound mismatches, however a capture (or Suricata inspection) on this interface will cease to function when there are no active attached hosts and will not start again unless the capture/IDS process is restarted. Thus if you are running a single VM as I have been and it reboots, your pcap and IDS processes will exit prematurely and will not resume when the VM does.

1: lo: <LOOPBACK,UP,LOWER_UP> mtu 65536 qdisc noqueue state UNKNOWN group default qlen 1
 link/loopback 00:00:00:00:00:00 brd 00:00:00:00:00:00
 inet 127.0.0.1/8 scope host lo
 valid_lft forever preferred_lft forever
 inet6 ::1/128 scope host
 valid_lft forever preferred_lft forever
2: ens192: <BROADCAST,MULTICAST,UP,LOWER_UP> mtu 1500 qdisc mq state UP group default qlen 1000
 link/ether 00:0c:29:3b:c7:47 brd ff:ff:ff:ff:ff:ff
 inet 10.0.0.4/24 brd 10.0.0.255 scope global ens192
 valid_lft forever preferred_lft forever
 inet6 fe80::20c:29ff:fe3b:c747/64 scope link
 valid_lft forever preferred_lft forever
3: virbr0: <BROADCAST,MULTICAST,UP,LOWER_UP> mtu 1500 qdisc noqueue state UP group default qlen 1000
 link/ether 52:54:00:ba:65:0e brd ff:ff:ff:ff:ff:ff
 inet 10.0.3.1/24 brd 10.0.3.255 scope global virbr0
 valid_lft forever preferred_lft forever
4: virbr0-nic: <BROADCAST,MULTICAST> mtu 1500 qdisc pfifo_fast master virbr0 state DOWN group default qlen 1000
 link/ether 52:54:00:ba:65:0e brd ff:ff:ff:ff:ff:ff
28: vnet0: <BROADCAST,MULTICAST,UP,LOWER_UP> mtu 1500 qdisc pfifo_fast master virbr0 state UNKNOWN group default qlen 1000
 link/ether fe:54:00:51:49:d6 brd ff:ff:ff:ff:ff:ff
 inet6 fe80::fc54:ff:fe51:49d6/64 scope link
 valid_lft forever preferred_lft forever

■ breaks when VM is shut down or restarted
■ may encounter issues with packet rewriting/tcp reassembly

Once the networking is set up, you can then deploy IDS to monitor it. There are two choices to consider, Snort and Suricata, and of these, the latter is so simple to get running that I’m largely mentioning the other to be charitable. Since versions and options change every few months I am not going to lay out a configuration; it would probably be obsolete by the time you read this. I will however highlight a couple of options in the current version (4.0.4 at the time of writing) of Suricata that deserve special mention.

eve-log: This is a catch-all log which can be configured to contain many different event types. Suricata can log metadata for many different protocols and situations including HTTP, DNS, TLS certificates, transferred files (e.g. HTTP downloads) including hashes, SMTP, and more. Almost all of this information is potentially useful in the context of a sandbox. While it is possible to spin off separate logs for each of these items, the JSON structure of the output makes it easy to parse and having them all together is convenient. Suricata supports rotating this log, naming according to a timestamp pattern, and setting custom permissions, all of which can be very handy.

rule-files: These are your detections, choose them wisely. The biggest bang for your buck is in the Emerging Threats community ruleset (free!), but not all of them will be applicable to a sandbox.  You should consider disabling ones which are irrelevant; for example, ‘inappropriate’, ‘icmp’, ‘mobile_malware’, ‘games’, and ‘scada’ are unlikely to be applicable.

Similarly your packet capture should be done on the virtual network interface and not the bridge. For capturing packets there are a wealth of options, of which I have tried a number. Here are some of the highlights:

tcpdump: the obvious first choice as it’s what everyone’s used to, but for a permanent capture service, not the best one. Will output to a single specified file until cancelled and restarted with a different destination, meaning that the process of managing the output is entirely down to you.

scapy: this was my choice for a long time due to it being possible to control from within python. However, if you are running more than one sandbox VM and want simultaneous capture of traffic from multiple sources, this is not an efficient choice.

pyshark/tshark: another python library, and the underlying tool called by pyshark; the latter efficiently captures everything, and unlike TCPdump, has the ability to manage rotation of capture files itself.

dumpcap: the base utility underlying tshark’s packet capture. tshark is possibly overkill as it is capable of far more than simply capturing packets. This is the method I am using at the time of writing.

For example, an hourly cron script as follows should create 24 one-hour pcap files, overwritten each day:

HOUR=`date -u +'%H'`
dumpcap -i vnet0 -a duration:3600 -q -w /usr/local/unsafehex/antfarm/pcaps/$HOUR.pcap -f "<your filters here>"

Note the -u flag passed to date; when trying to make sense of events and logs, it is crucial to ensure that your time information lines up. The simplest way to do this is to log everything in UTC; if desired you can convert to local time when presenting the information to the user. Also, use the main crontab as cron.hourly entries don’t necessarily run on the hour mark and it is important for this concept that each file matches the hour span that it is named for.

As well as capturing the output and running IDS signatures against it, you may want to consider performing SSL interception. This is a complicated topic and I have not mastered it, so I will not attempt to offer complete instructions at this point. However I will give a few pointers based on what I know so far. The simplest means of performing SSL interception for you is likely to be the squid proxy and its ssl_bump feature. This can be done as an explicit proxy (you will need to configure your client) or as a transparent proxy. In either case you will need to install the certificate you have made into the client as a trusted root.

SSL intercept does not play nicely with tor. It may be possible to still get it working with some routing/iptables magic, but the normal choice for routing squid through tor of using priovxy as a parent will not workEven if you do get your traffic routed through a proxy to tor, beware of DNS leakage. Using privoxy as the parent combats this; if you bypass this stage you will need to come up with a new solution for preventing DNS leak. I plan to integrate SSL intercept but only once I have the option of a dynamic IP.

There are other tools that you might consider using with your network traffic inspection, such as the metadata-logging framework Bro; however with recent updates, Suricata’s metadata capture is so powerful that it’s unlikely you’ll need anything else.

In the next post I discuss automating the delivery and execution of malware to the guest VM, and simulating user interaction.

Host activity monitoring

20,000 Leagues Under The Sand – Part 2

read part 1

As a newbie sandboxer, the biggest obstacle for me was finding a way of getting in-depth information on what actions were being performed by malware I wanted to test. In particular, I wanted to be able to drop some samples, go away and make lunch, then come back and be looking at some results. That meant stepping through it in a debugger was out, or at least a lesson for another day. You’ve probably already seen that I ended up using Sysmon, but let’s have a look at the alternatives for a moment.

Built in Windows logging

Filesystem forensics

  • The files in C:\Windows\Prefetch\ can show if executables were run
  • The AppCompatCache registry key and AmCache.hve hive contain more detailed information on program execution, though neither logs individual execution instances or command line options
  • You can diff the filesystem – have a clean copy, either of the Master File Table or of the entire structure – and compare to see what’s changed; this is a fairly intensive operation, especially if you intend to see if a known good file has been replaced with a malicious version
  • There are tools for parsing registry hives so identifying new/modified keys is possible

Creating your own API call logging

  • If you’re a good enough programmer to write code that logs API calls, this is the gold standard. I am not (yet) up to this. It is possible to monitor for most of the interesting events such as process and file creation, registry modification etc. using filter drivers. If you want to go a step further and monitor (or even intercept and change) system calls, you need to be looking at DLL injection. This is the method used by Cuckoo sandbox, among many others.

Building monitoring in to the virtualisation

  • Technically this is all just code simulating hardware running other code. If you’re smart enough to modify a hypervisor so that it can recognise and log API calls within its guests, go for it. Please excuse me for thinking you’re a bit mad though!

Options #1, #2 and #4 hold an additional advantage of being difficult or impossible for sandbox evasion techniques to pick up on.

And then we get to Sysmon, which is in effect a version of #3, but it has a big advantage: somebody else did all the work for us! Hooray for Mark Russinovich and Thomas Garnier. Many sandboxes do API call monitoring; sometimes it can be a little bit excessively detailed (hello Cuckoo) but as far as understanding what malware is doing goes, it’s the bee’s knees. Let’s have a look at what you can get out of it.

Sysmon ProcessCreate event output

Sysmon Process Created event

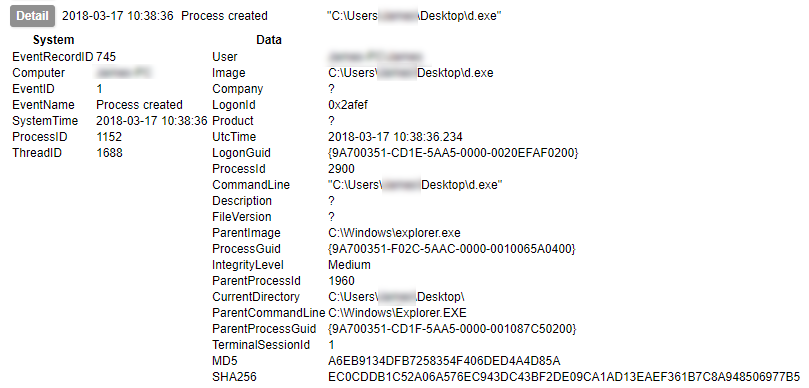
We’ll ignore for now how much my UI leaves to be desired. Here is perhaps the most commonly of interest event to you: Process Created. In this event you have a wealth of data including not only the location of the executable, launch command and parent processes, but the MD5 and SHA256 hashes of the file. You can also get the import hash here too – though I’d forgotten to turn it on for this run. You can see what ran, from where, by whom, and how it was run, in a glance.

Sysmon File Created event output

Sysmon File Created event

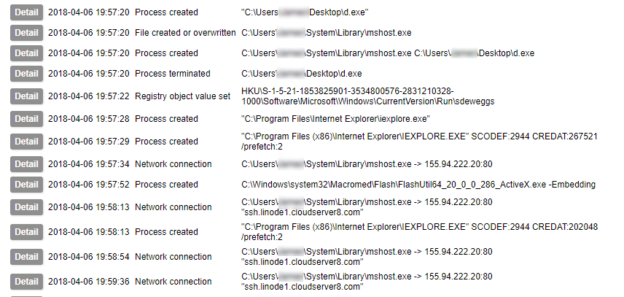
Next up we can log the act of creating a file; in this case a trojan makes new copy of itself which is placed in C:\Users\<username>\System\Library\mshost.exe.

Sysmon Registry Value Set event data

Sysmon Registry Value Set event

You can also monitor for interesting things happening in the registry. This is one of the primary methods by which malware achieves “persistence”, i.e. the ability to remain active on the system it infects. Here we can see a new entry being created in one of the user’s Run keys.

Sysmon Network Connection output

Sysmon Network Connection event

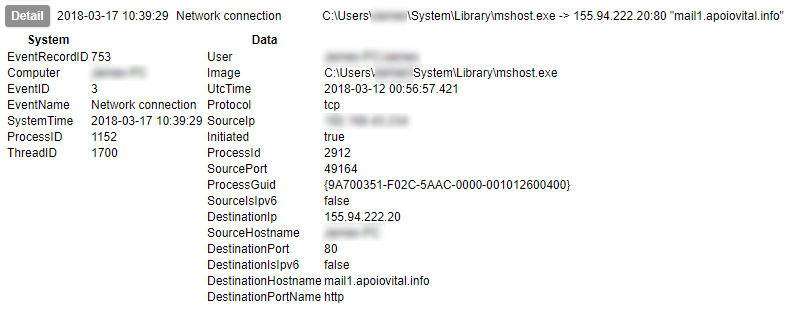
In a final example, Sysmon allows you to detect initiation of network connections; not only do we have the network level data of the destination IP and port captured, but the destination hostname is also identified.

In just four event types, Sysmon is able to record the malware starting, hiding itself, achieving persistence, and contacting its Command and Control server. This is the power of logging API calls. But wait – there’s more! This only scratches the surface of what Sysmon can do. It is also capable of identifying:

  • A process changing the creation time of a file
  • Process termination
  • Loading of drivers
  • Loading of additional modules in to existing processes
  • Creation of threads within other running processes
  • Raw access to the disk (as opposed to using the file system APIs)
  • Access to another process’s memory
  • Creation of alternate data streams
  • Use of named pipes (a method of communicating between processes)
  • Use of Windows Management Instrumentation

As you can see, it’s a fantastic tool which would be pretty hard to top if you decided to try doing this yourself. If you are thinking of experimenting with malware – or looking for something to help you keep a closer eye on your systems in general – I can’t recommend it enough.

In part 3 I will discuss the use of IDS and packet capture tools to get detailed information on the malware’s communication.