Recently, @da_667 posted an excellent introduction to threat hunting in Splunk. The information in Sysmon EID 1 and Windows EID 4688 process execution events is invaluable for this task. Depending on your environment, however, you might find these searches frustratingly slow, especially if you are trying to look at a large time window. You may also have noticed that although these logs concern the same underlying event, you are using two different searches to find the same thing. Is there anything we can do to improve our searches? Spoiler: yes!
One of the biggest advantages Splunk grants is in the way it turns the traditional model of indexing SIEM events on its head. Instead of parsing all the fields from every event as they arrive for insertion into a behemoth of a SQL database, they decided it was far more efficient to just sort them by the originating host, source type, and time, and extract everything else on the fly when you search. It’s a superb model, but does come with some drawbacks.
Some searches that might have been fast in a database are not so rapid here. Again, because there is no database, you are not constrained to predefined fields set by the SIEM vendor – but there is nothing to keep fields with similar data having the same name, so every type of data has its own naming conventions. Putting together a search that covers three different sources for similar data can mean having to know three different field names, event codes specific to the products… it can get to be quite a hassle!
The answer to these problems is datamodels, and in particular, Splunk’s Common Information Model (CIM). Datamodels allow you to define a schema to address similar events across diverse sources. For example, instead of searching
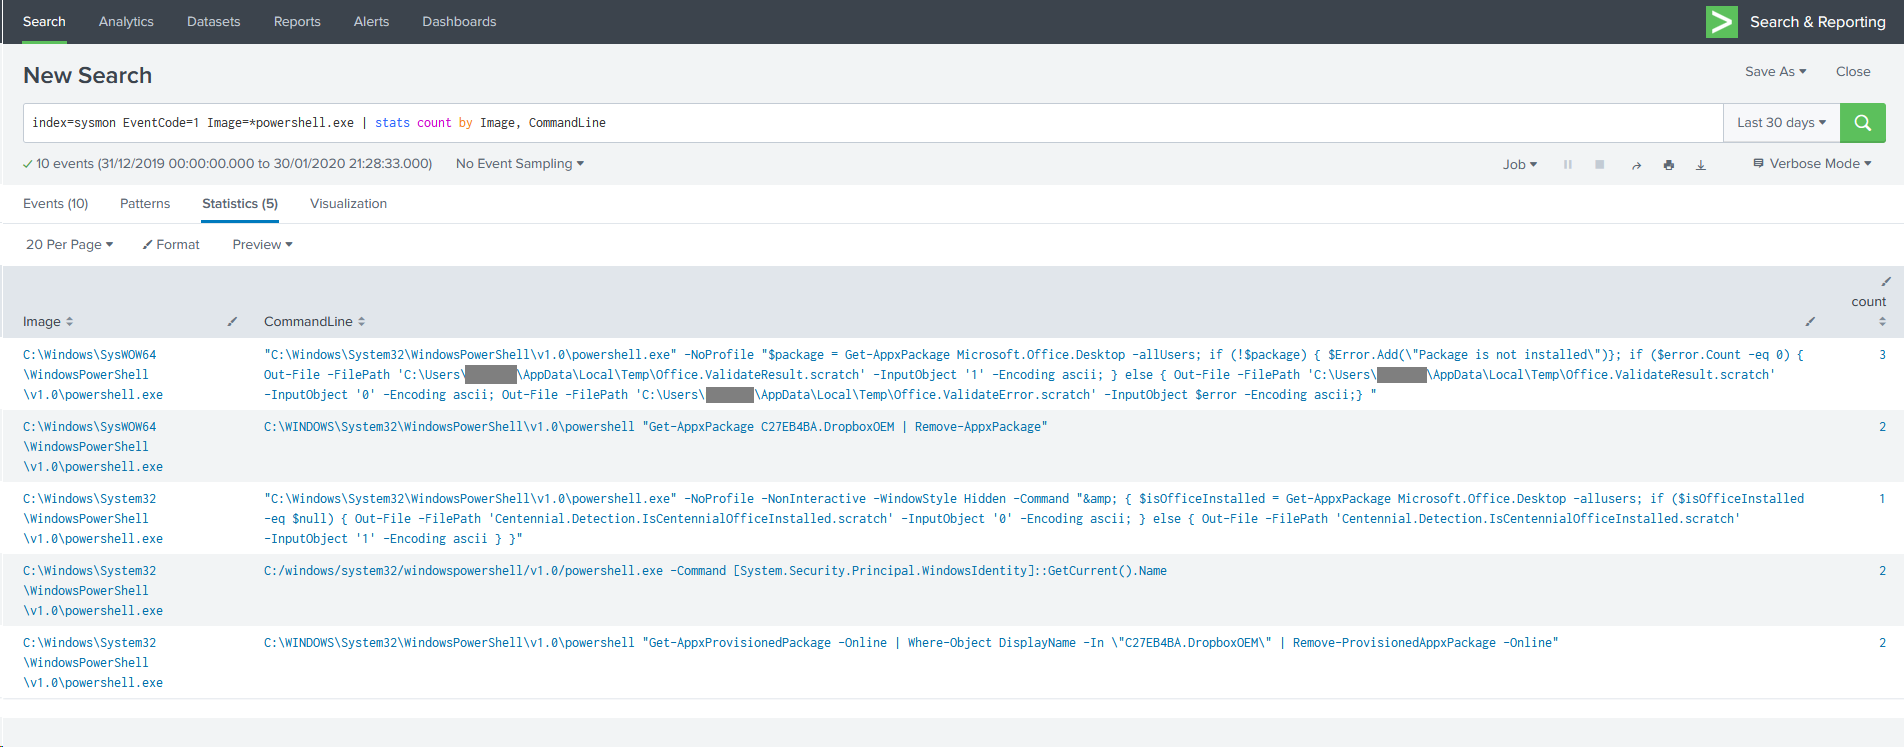
index=wineventlog EventCode=4688 New_Process_Name="*powershell.exe"
and
index=sysmon EventCode=1 Image=*powershell.exe
separately, you can search the Endpoint.Processes datamodel for process_name=powershell.exe and get results for both. The CIM is a set of predefined datamodels for, as the name implies, types of information that are common. Once you have defined a datamodel and mapped a sourcetype to it, you can “accelerate” it, which generates indexes of the fields in the model. This process carries a storage, CPU and RAM cost and is not on by default, so you need to understand the implications before enabling it.
Turn it up to 11
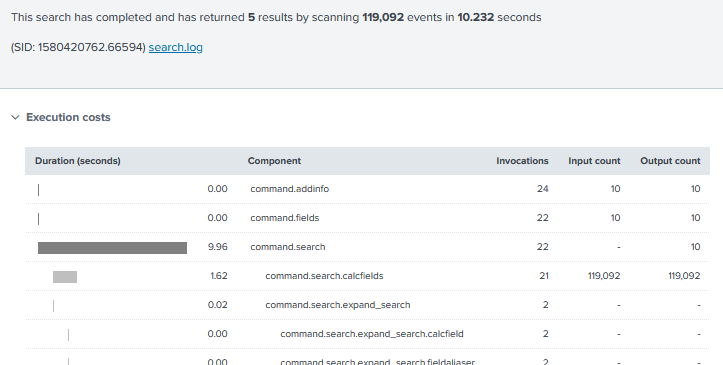
Let’s take this example, based on the fourth search in @da_667’s blog. In my (very limited) data set, according to the Job Inspector, it took 10.232 seconds to search 30 days’ worth of data. That’s not so bad, but I only have a few thousand events here, and you might be searching millions, or tens of millions – or more!
What happens if we try searching an accelerated datamodel instead? Is there much of a difference?
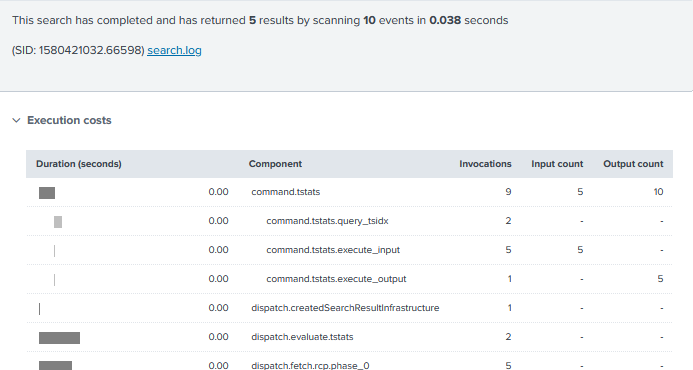
Holy shitballs yes it does. This search returned in 0.038 seconds, that’s nearly 270x faster! What sorcery is this? Well, the command used was:
| tstats summariesonly=true count from datamodel=Endpoint.Processes where Processes.process_name=powershell.exe by Processes.process_path Processes.process

What’s going on in this command? First of all, instead of going to a Splunk index and running all events that match the time range through filters to find “*.powershell.exe“, my tstats command is telling it to search just the tsidx files – the accelerated indexes mentioned earlier – related to the Endpoint datamodel. Part of the indexing operation has broken out the process name in to a separate field, so we can search for an explicit name rather than wildcarding the path.
The statistics argument count and the by clause work similarly to the traditional stats command, but you will note that the search specifies Processes.process_name – a quirk of the structure of data models means that where you are searching a subset of a datamodel (a dataset in Splunk parlance), you need to specify your search in the form
datamodel=DatamodelName[.DatasetName] where [DatasetName.]field_name=somevalue by [DatasetName.]field2_name [DatasetName.]field3_name
The DatasetName components are not always needed – it depends whether you’re searching fields that are part of the root datamodel or not (it took me ages to get the hang of this so please don’t feel stupid if you’re struggling with it).
Filtered, like my coffee
Just as with the Hurricane Labs blog, options for filtering and manipulating tstats output can be managed with the same operations.
| tstats summariesonly=true count from datamodel=Endpoint.Processes where Processes.process_name=powershell.exe NOT Processes.parent_process_name IN ("code.exe", "officeclicktorun.exe") by Processes.process_path Processes.process | `drop_dm_object_name("Processes")`
You can filter on any of the fields present in the data model, and also by time, and the original index and sourcetype. The resulting data can be piped to whatever other manipulation/visualisation commands you want, which is particularly handy for charts and other dashboard features – your dashboards will be vastly sped up if you can base them on tstats searches.
You’ll also note the macro drop_dm_object_name – this reformats the field names to exclude the Processes prefix, which is handy when you want to manipulate the data further as it makes the field names simpler to reference.
A need for speed
How do I get me some of this sweet, sweet acceleration I hear you ask? The first thing to understand is that it needs to be done carefully. You will see an increase in CPU and I/O on your indexers and search heads. This is because the method involves the search head running background searches that populate the index. There will be a noticeable increase in storage use, with the amount depending on the summary range (i.e. time period covered by detailed indexing) and how busy your data sources are.
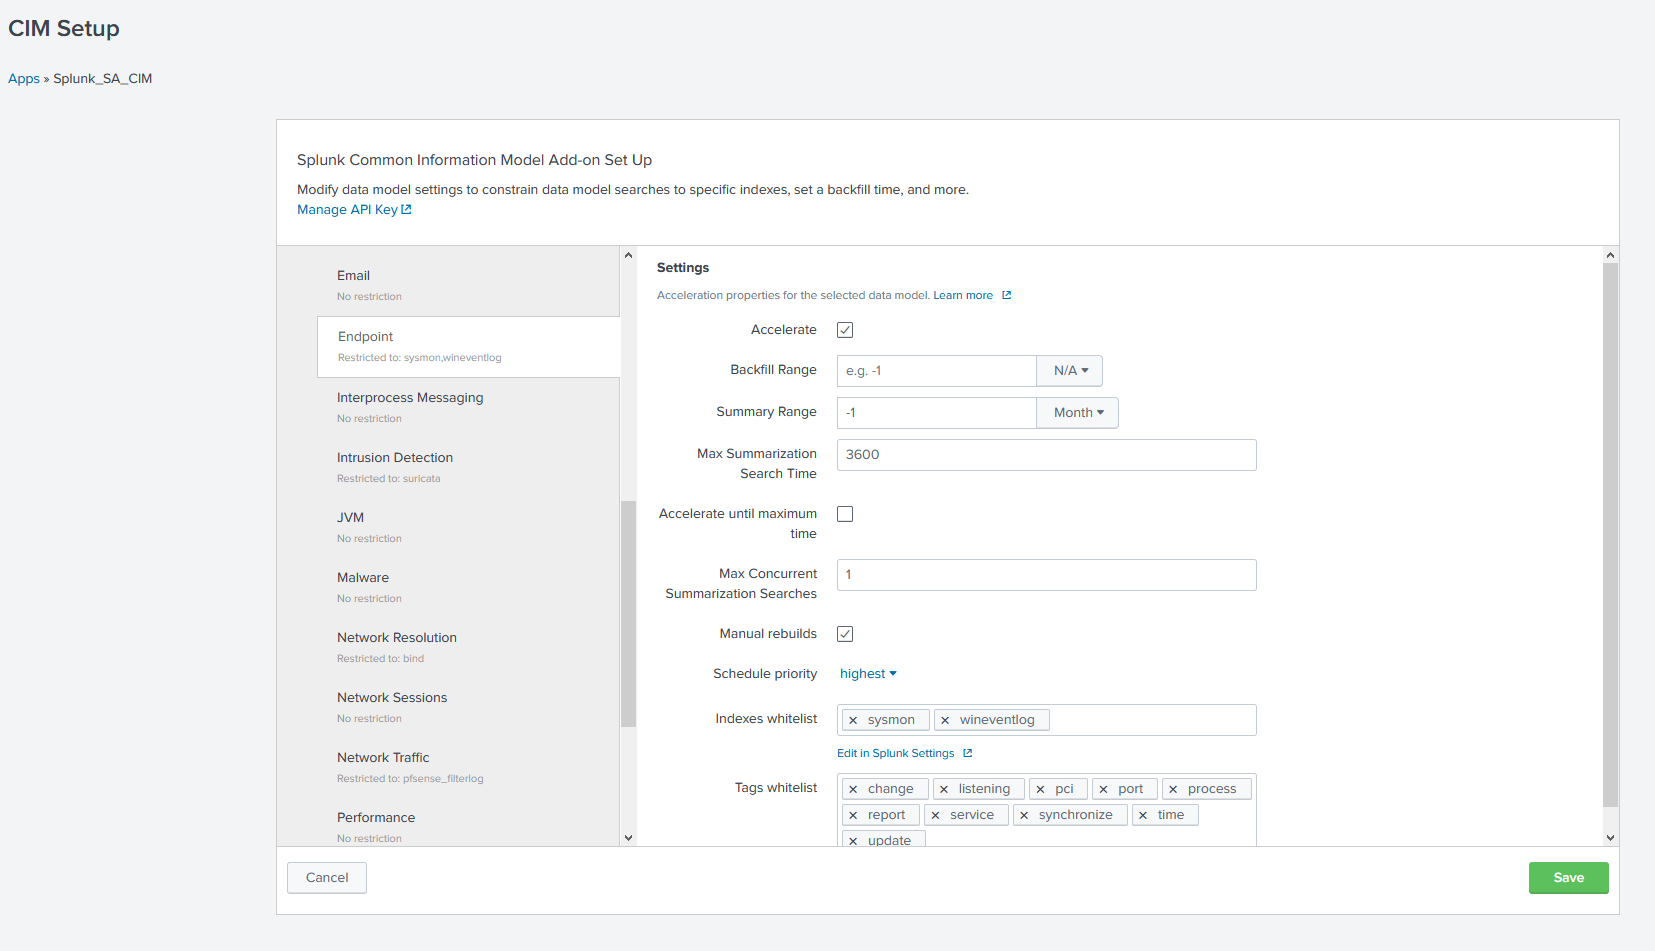
With this in mind, you can start looking at the Common Information Model app and the documentation on accelerating data models. I highly recommend consulting Splunk’s Professional Services before forging ahead, unless your admins are particularly experienced. The basic process is as follows:
- Ensure that your sourcetypes are CIM compliant. For most Splunk-supported apps, this is already done.
- Ensure that you have sufficient resources to handle the increased load
- Deploy the CIM app
- Enable acceleration for the desired datamodels, and specify the indexes to be included (blank = all indexes. Inefficient – do not do this)
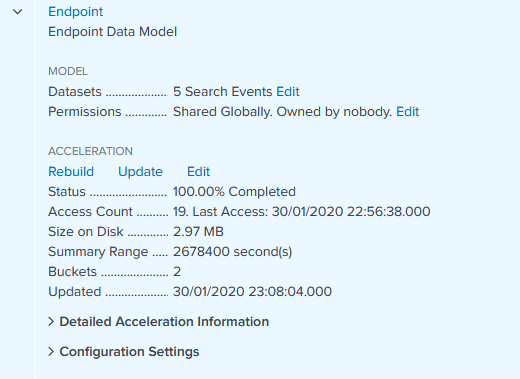
- Wait for the summary indexes to build – you can view progress in Settings > Data models
- Start your glorious tstats journey
Datamodels are hugely powerful and if you skim through the documentation you will see they can be applied to far more than just process execution. You can gather all of your IDS platforms under one roof, no matter the vendor. Get email logs from both Exchange and another platform? No problem! One search for all your email! One search for all your proxy logs, inbound and outbound! Endless possibilities are yours.
One search to rule them all, one search to find them… happy Splunking!